Create Challenges & Activities
Note: To create challenges & Activities content you need to logged in as Super Admin.
To create Challenges & Activities follow steps given below.
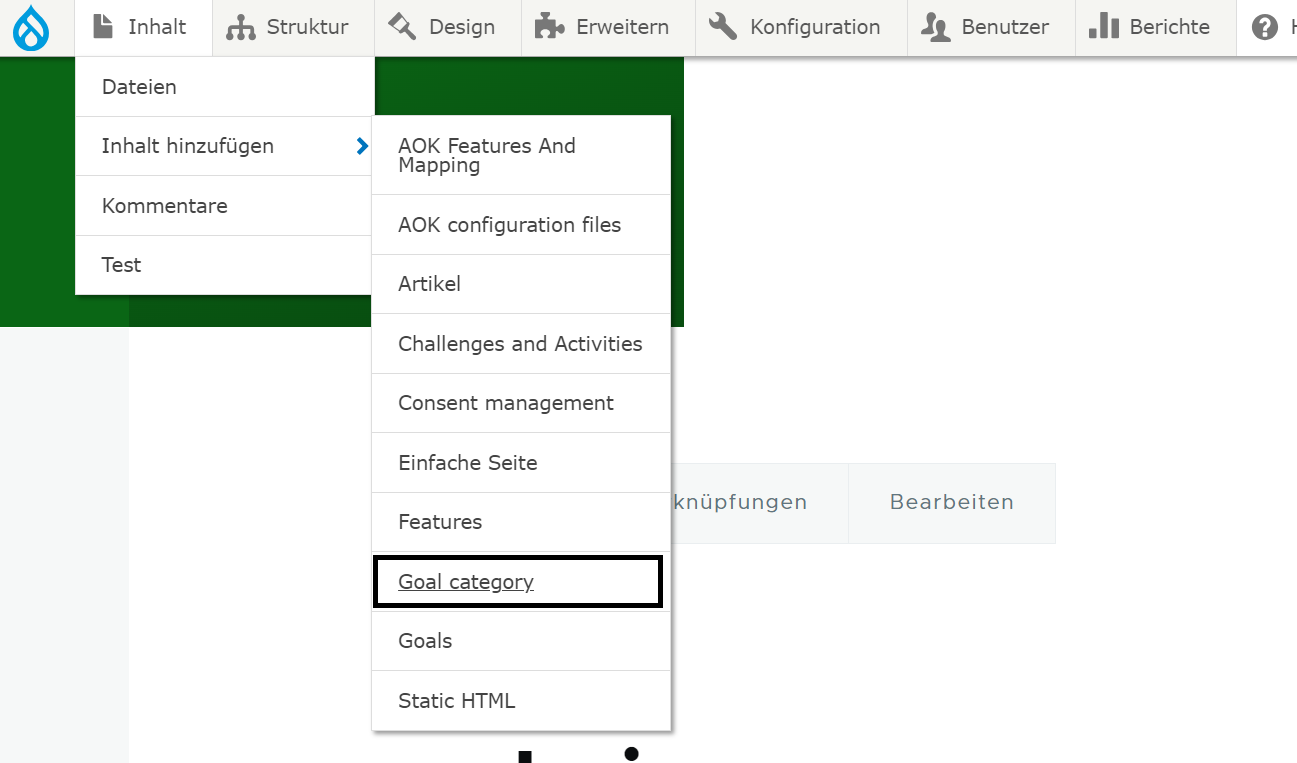
Create Goal Category
Create goal category, it is the main type of Goals Ex. Mental, Physical etc..
- Select Inhalt (Content) -> Inhalt hinzufügen (Add Content) -> Goal Category
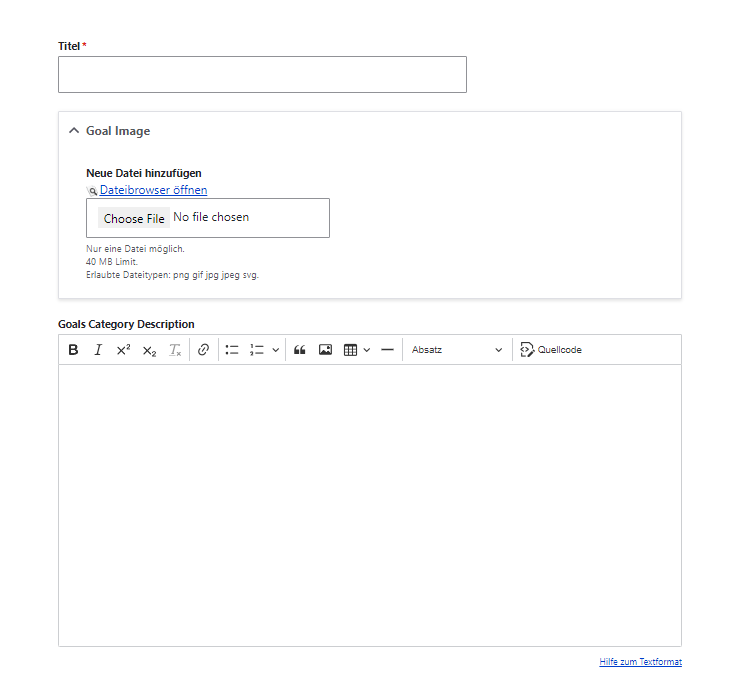
- Enter 'Titel'
- Add 'Goal Image' click on 'Dateibrowser öffnen (open file browser)' -> select image from the right section list of images -> click on 'Auswahlen (Select)' it will add image. (Please upload image in Files Server first and then select, do not upload image directly. Plese refer ImceFilesServer documentation for more information about how to upload images to CMS)
- Enter 'Goals Category Description' formatted, it can accept HTML tags.
- Click on 'Speichern (Save)' check if 'Veröffentlicht (Published)' checkbox is checked.
Edit Goal Category Page
To edit Goal Category pages follow given steps,
- Click on 'Inhalt(content)'.
- Choose the Goal Category page to edit (check if Inhaltstype is 'Goal Category') -> Click on 'Bearbeiten(Edit)' button at right side respective at Titel column.
- Edit the page, after editing please make sure 'Vröffentlicht(published)' is chcked.
- Click on 'Speichern(Save)' button.
Create Goals
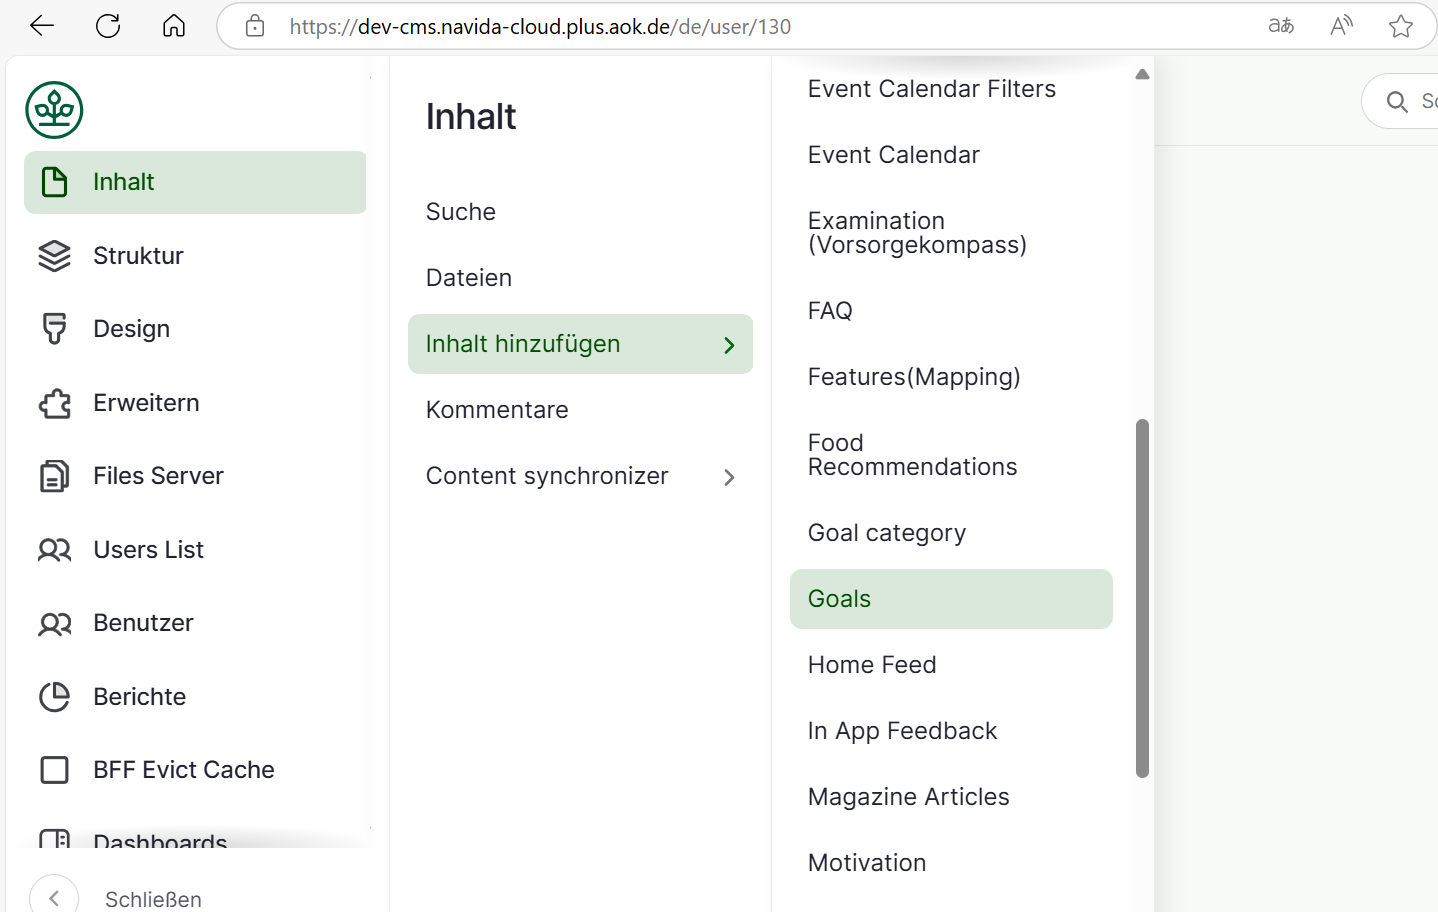
- Select Inhalt (Content) -> Inhalt hinzufügen (Add Content) -> Goals
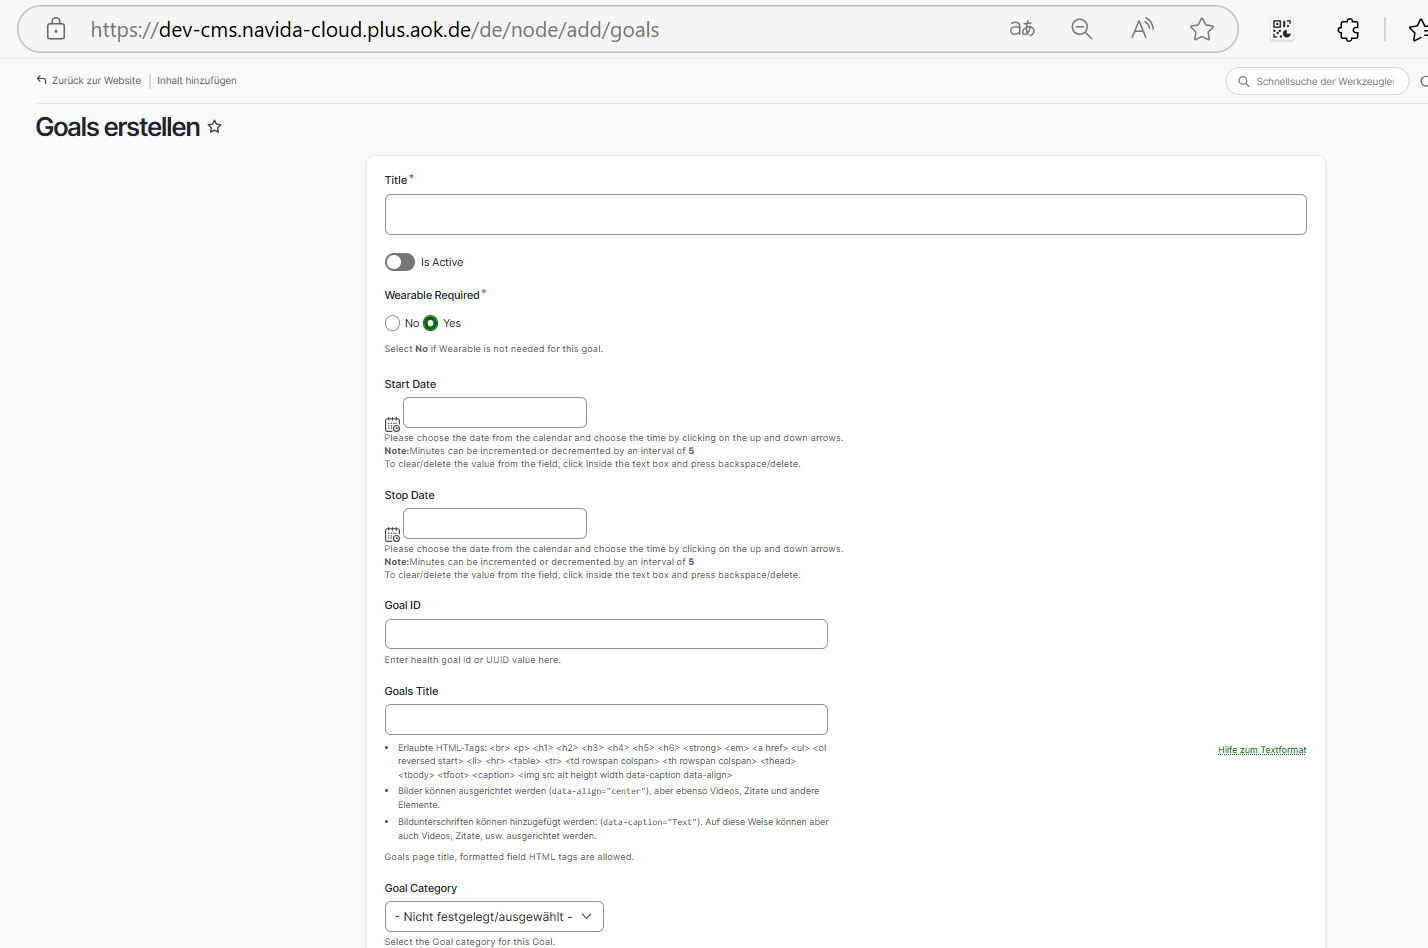
- Enter 'Titel'
- Select 'Is Active' if the goal is active.
- Select Yes if 'Wearable Required' is required for the Goal. Note: By default the value is selected as Yes.
- Select 'Start Date' and pick the desired date and time.
- Select 'Stop Date' and choose the desired date and time.
- Enter 'Goal ID' health goal Id or UUID value here.
- Enter 'Goals Title' this field accept HTML tags.
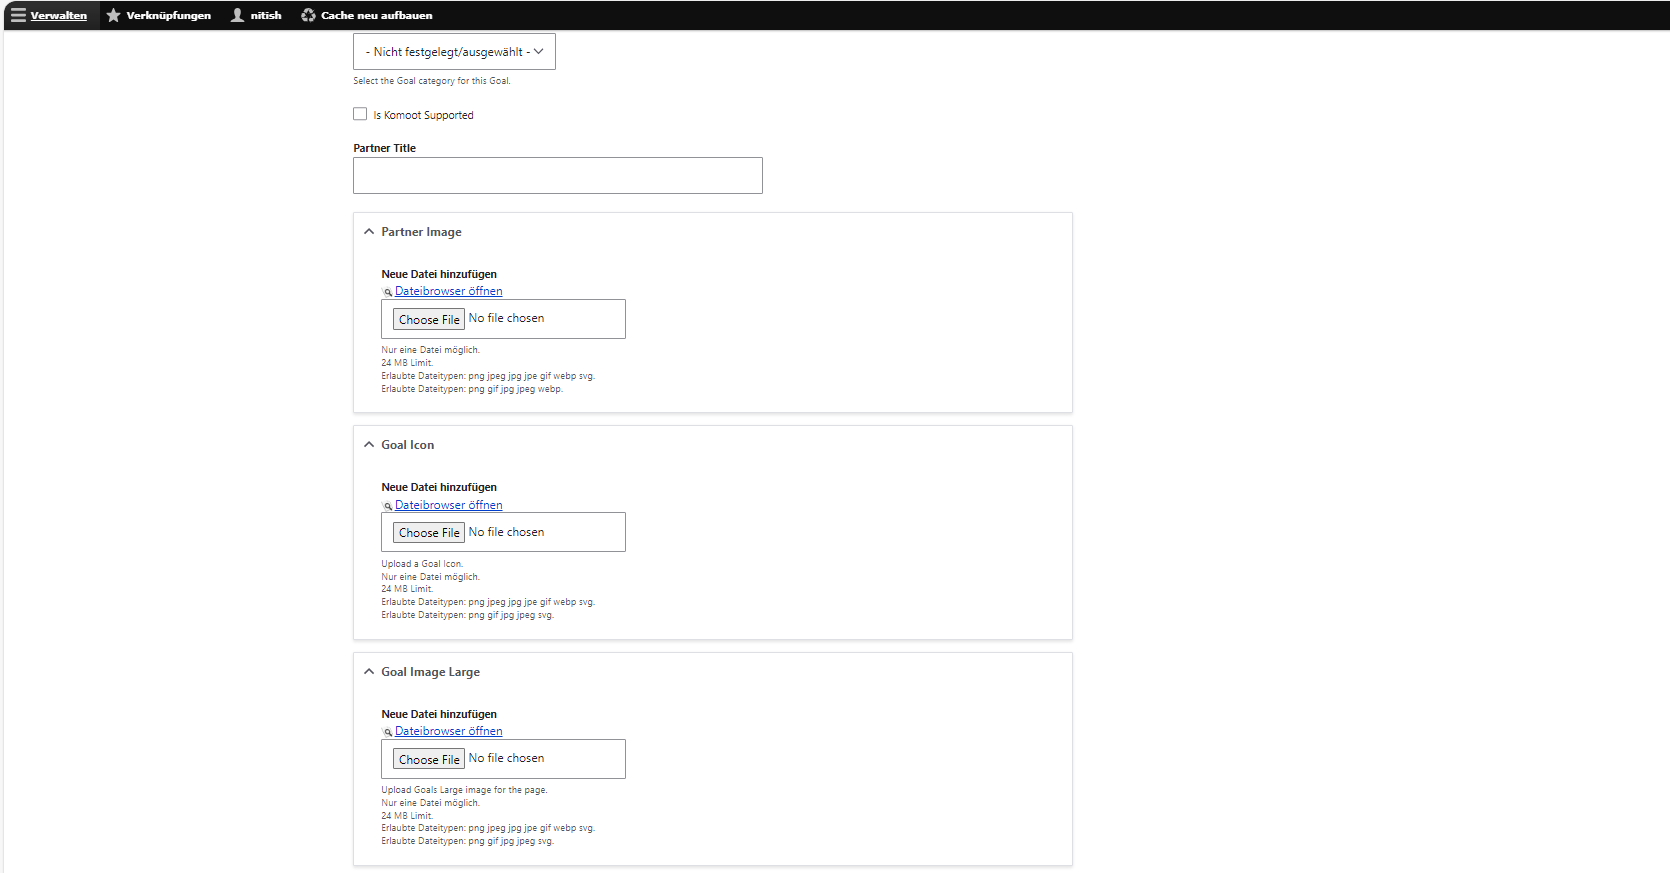
- Select 'Goal Category' for this goal.
- Select 'Is Komoot Supported' if the goal is supports komoot.
- Enter 'Partner Title'.
- Add 'Partner Image' click on 'Dateibrowser öffnen (open file browser)' -> select image from the right section list of images -> click on 'Auswahlen (Select)' it will add image. (Please upload image in Files Server first and then select, do not upload image directly. Plese refer ImceFilesServer documentation for more information about how to upload images to CMS) and also enter the alternative text for the image.
- Add 'Goal Icon' click on 'Dateibrowser öffnen (open file browser)' -> select image from the right section list of images -> click on 'Auswahlen (Select)' it will add image. (Please upload image in Files Server first and then select, do not upload image directly. Plese refer ImceFilesServer documentation for more information about how to upload images to CMS)
- Add 'Goal Image Large' click on 'Dateibrowser öffnen (open file browser)' -> select image from the right section list of images -> click on 'Auswahlen (Select)' it will add image. (Please upload image in Files Server first and then select, do not upload image directly. Plese refer ImceFilesServer documentation for more information about how to upload images to CMS) and also enter the alternative text for the image.
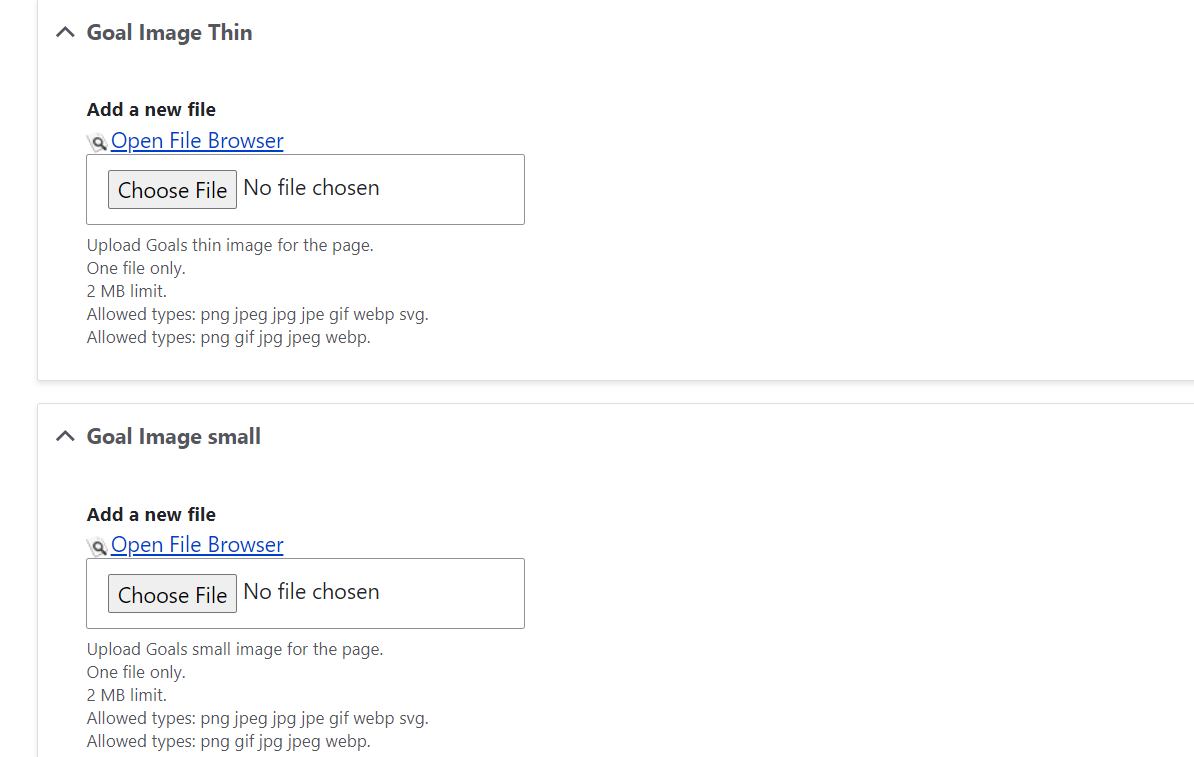
- Add 'Goal Image Thin' click on 'Dateibrowser öffnen (open file browser)' -> select image from the right section list of images -> click on 'Auswahlen (Select)' it will add image. (Please upload image in Files Server first and then select, do not upload image directly. Plese refer ImceFilesServer documentation for more information about how to upload images to CMS) and also enter the alternative text for the image.
- Add 'Goal Image Small' click on 'Dateibrowser öffnen (open file browser)' -> select image from the right section list of images -> click on 'Auswahlen (Select)' it will add image. (Please upload image in Files Server first and then select, do not upload image directly. Plese refer ImceFilesServer documentation for more information about how to upload images to CMS) and also enter the alternative text for the image.
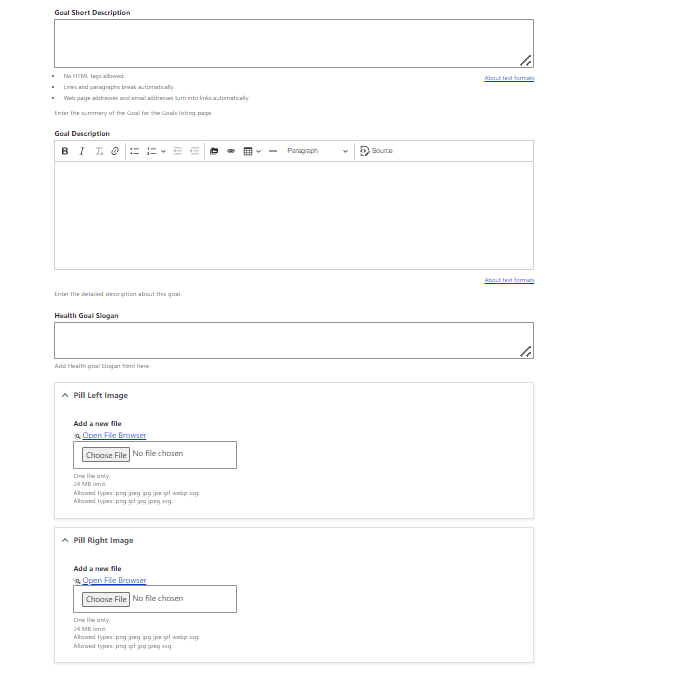
- Enter 'Goal Short Description' description will be displayed in Goals Listing page.
- Enter 'Goal Description' formatted, it can accept HTML tags.
- Enter 'Health Goal Slogan' Add Health goal Slogan html here.
- Add 'Pill Left Image' click on 'Dateibrowser öffnen (open file browser)' -> select image from the right section list of images -> click on 'Auswahlen (Select)' it will add image. (Please upload image in Files Server first and then select, do not upload image directly. Plese refer ImceFilesServer documentation for more information about how to upload images to CMS) also enter the alternative text for the image.
- Add 'Pill Right Image' click on 'Dateibrowser öffnen (open file browser)' -> select image from the right section list of images -> click on 'Auswahlen (Select)' it will add image. (Please upload image in Files Server first and then select, do not upload image directly. Plese refer ImceFilesServer documentation for more information about how to upload images to CMS)also enter the alternative text for the image.
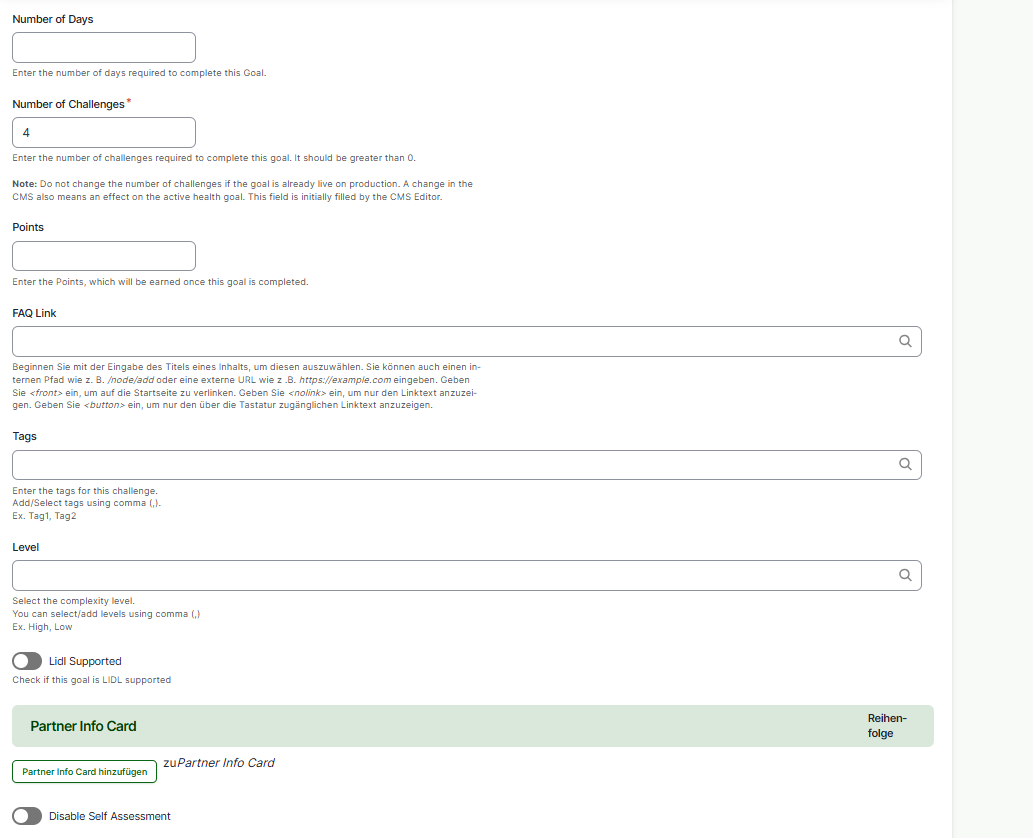
- Enter 'Number of Days' goal completion days.
- Enter 'Number of Challenges' challenges required for goal completion .
- Enter 'Points' which will be earned once this goal is completed.
- Enter 'Faq Link'
- Enter 'Tags' when you will type a word, if this tag is already available in CMS it will give the suggetion. Add/Select tags using comma (,). Ex. Tag1, Tag2
- Enter 'Level' when you will type a word, if this Level text is already available in CMS it will give the suggetion. You can select/add levels using comma. Ex. High, Low.
- Select 'Lidl Supported' if Lidl is Supported by this goal.
- Click on 'Lidl Supported Hinzufugen (Add Lidl Supported)' to add Lidl Supported partner card.
- Select 'Provider' from the dropdown list.
- Check 'Show Divider' if divider is required.
- Enter 'Title' for partner card.
- Enter 'Description' formatted, it can accept HTML tags.
- Add 'Image' click on 'Dateibrowser öffnen (open file browser)' -> select image from the right section list of images -> click on 'Auswahlen (Select)' it will add image. (Please upload image in Files Server first and then select, do not upload image directly. Plese refer ImceFilesServer documentation for more information about how to upload images to CMS).
- Enter 'Link' it accept url.
- Enter 'Link Text' as a plain text.
- Click on 'Partner Eligible Info Card Hinzufugen (Add Partner Eligible Info Card)' to add Partner Eligible Info card.
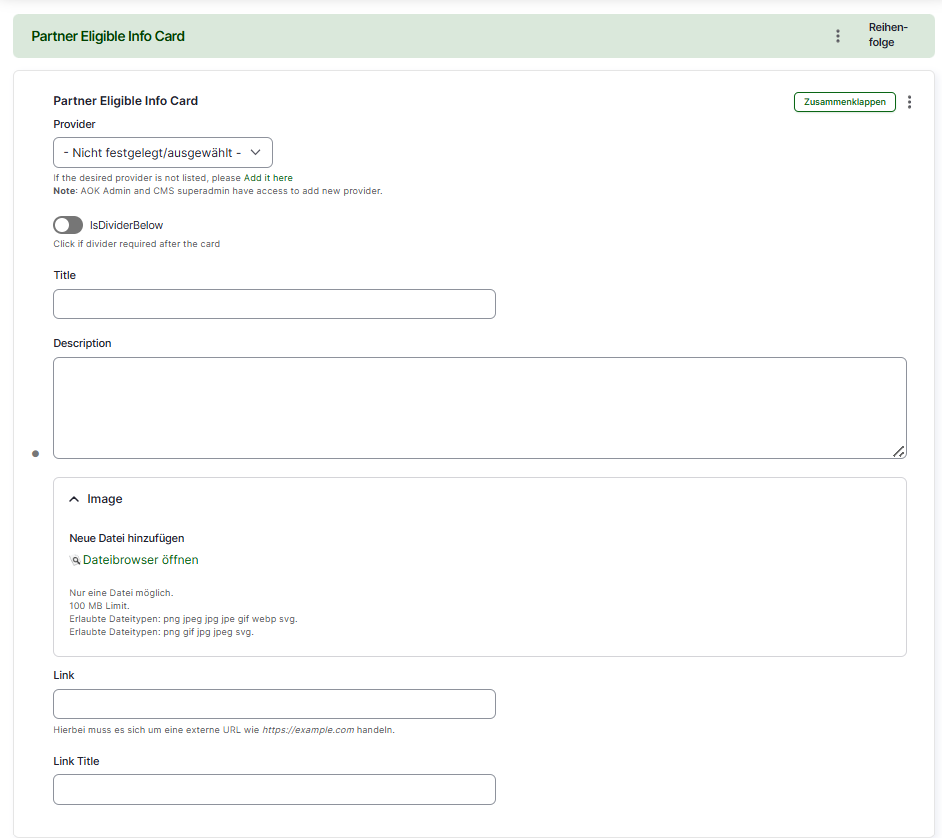
- Select 'Provider' from the dropdown list.
- Check 'Show Divider' if divider is required.
- Enter 'Title' for partner card.
- Enter 'Description' formatted, it can accept HTML tags.
- Add 'Image' click on 'Dateibrowser öffnen (open file browser)' -> select image from the right section list of images -> click on 'Auswahlen (Select)' it will add image. (Please upload image in Files Server first and then select, do not upload image directly. Plese refer ImceFilesServer documentation for more information about how to upload images to CMS).
- Enter 'Link' it accept url.
- Enter 'Link Text' as a plain text.
Self Examination Question
- Select 'Disable Self Assessment' if you want to disable self assessment for this goal.This field is shown in the above image.
- Enter 'Title' for the question.
- Add 'Image' click on 'Dateibrowser öffnen (open file browser)' -> select image from the right section list of images -> click on 'Auswahlen (Select)' it will add image. (Please upload image in Files Server first and then select, do not upload image directly. Plese refer ImceFilesServer documentation for more information about how to upload images to CMS)
- Enter 'Short Description' formatted, it can accept HTML tags.
- Enter 'Options Description' formatted, it can accept HTML tags.
- Enter 'Link' it accept url.
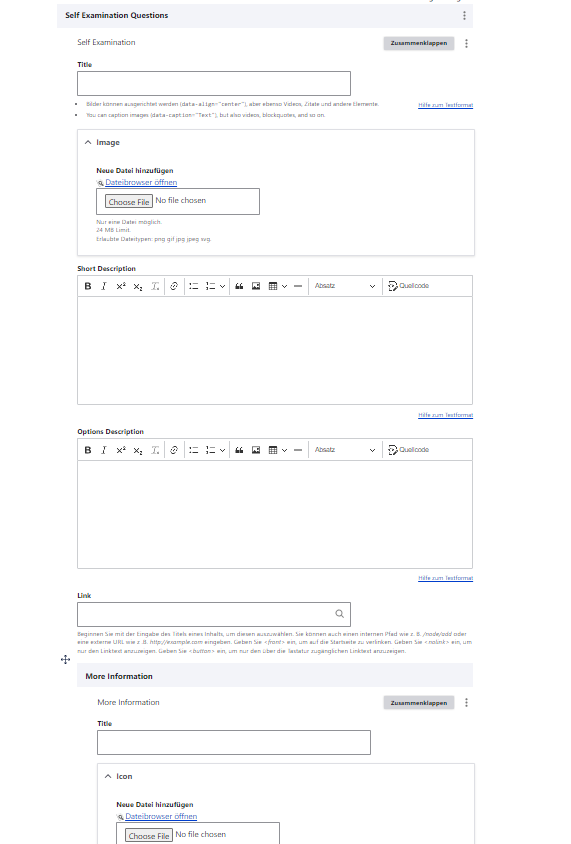
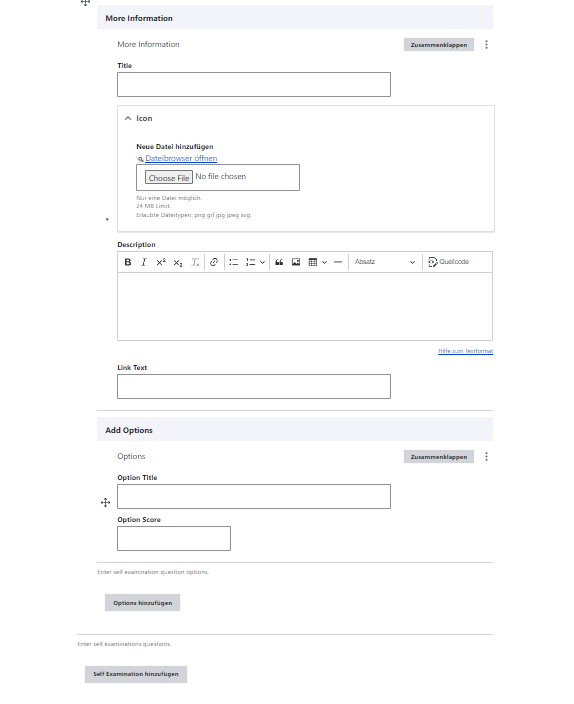
- Enter 'More Information' section add 'Title'
- Add 'Icon' click on 'Dateibrowser öffnen (open file browser)' -> select image from the right section list of images -> click on 'Auswahlen (Select)' it will add image. (Please upload image in Files Server first and then select, do not upload image directly. Plese refer ImceFilesServer documentation for more information about how to upload images to CMS)
- Enter 'Description' formatted, it can accept HTML tags.
- Enter 'Link Text' & 'Add Options' information
- Enter 'Option Title'
- Enter 'Option Score'. Click 'Option Hizufugen (Add Options)' to add multiple Options.
- Click on 'Self Examiniation Hinzufugen (Add Self Examination)' if there are multiple questions to be added.
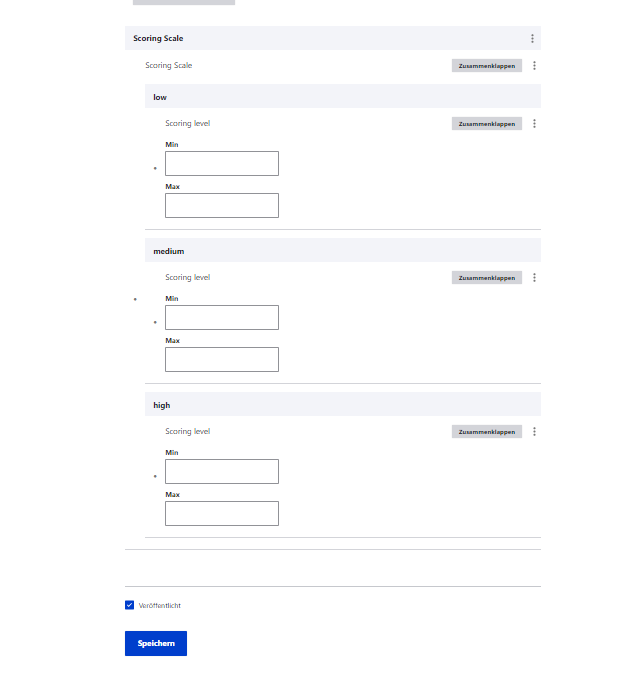
Add Scoring Scale
- Enter 'Min' & 'Max' scoring level values for 'low', 'medium' & 'high' sections
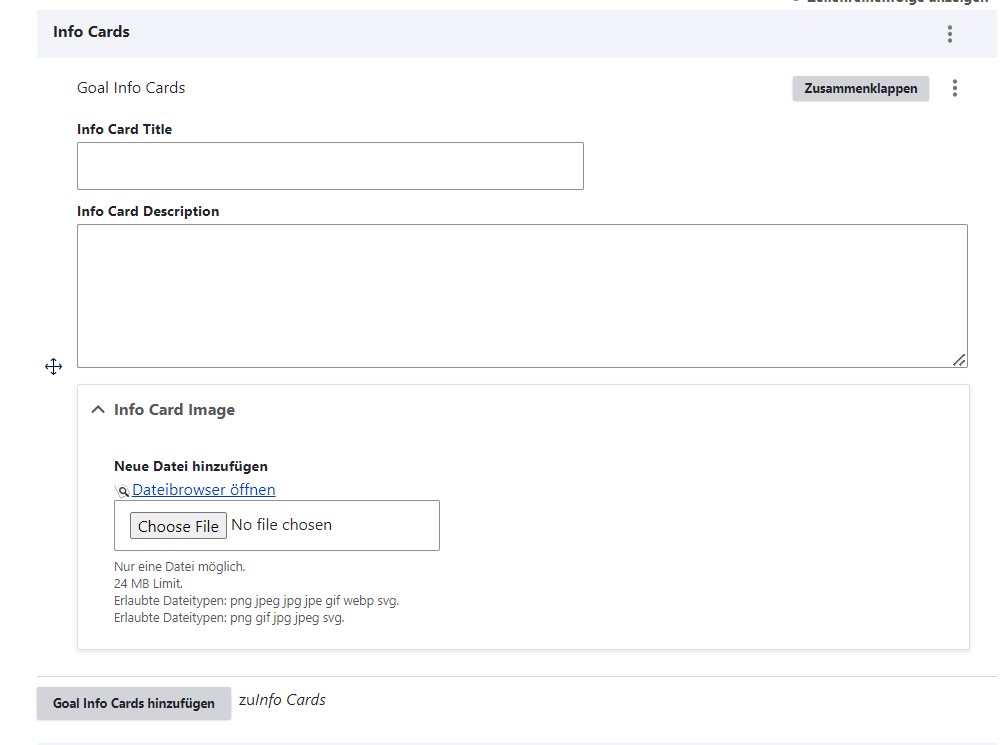
Add Goal Info Cards
- Enter 'Info Card Title'.
- Enter 'Info Card Description' formatted, it can accept HTML tags.
- Add 'Info Card Image' click on 'Dateibrowser öffnen (open file browser)' -> select image from the right section list of images -> click on 'Auswahlen (Select)' it will add image. (Please upload image in Files Server first and then select, do not upload image directly. Plese refer ImceFilesServer documentation for more information about how to upload images to CMS)
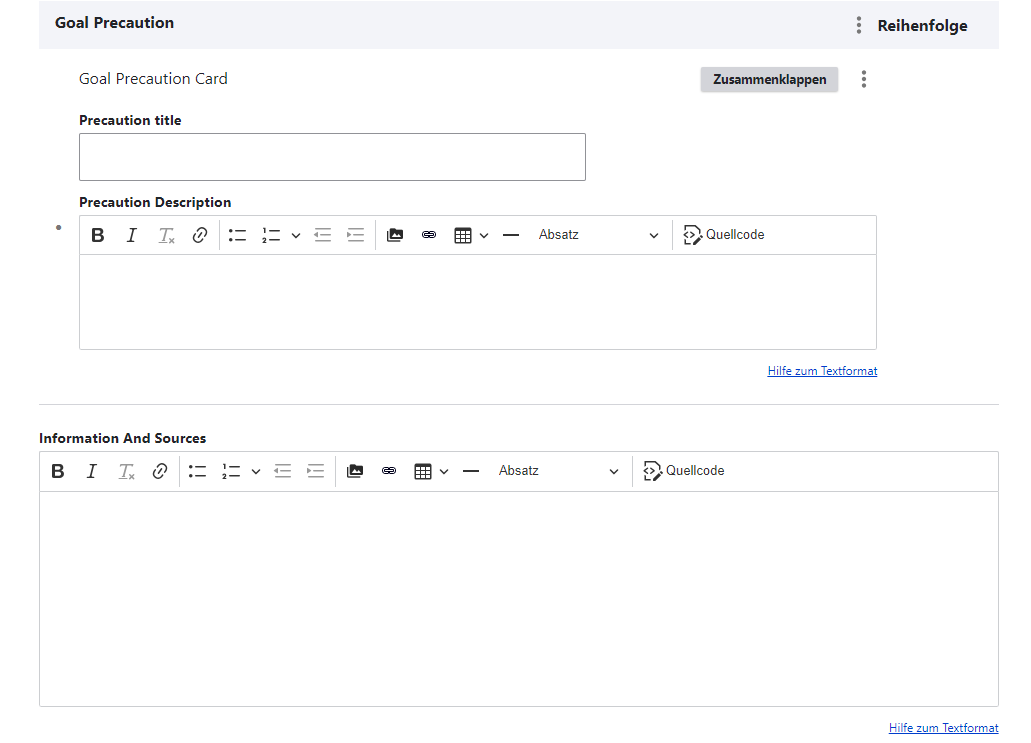
Add Goal Precaution
- Enter 'Precaution title'
- Enter 'Precaution Description' formatted, it can accept HTML tags.
- Enter 'Information And Sources' formatted, it can accept HTML tags.
- Click on 'Speichern (Save)' check if 'Veröffentlicht (Published)' checkbox is checked.
- After saving, we need to provide Grant for the AOK user we have added. Click on 'Grants' tab.
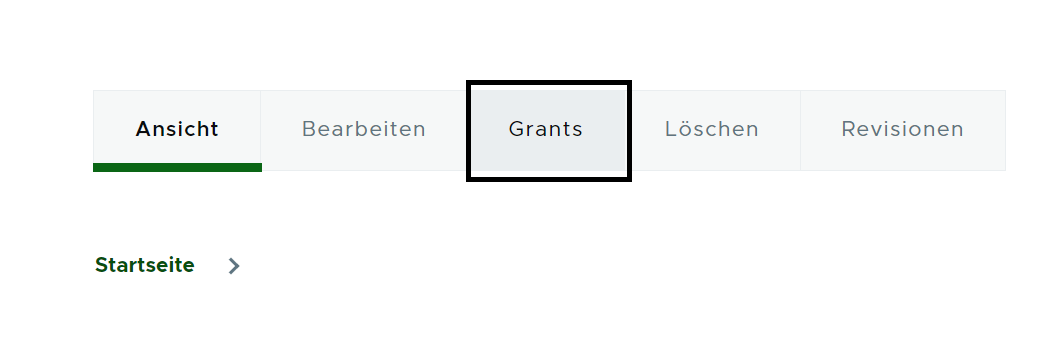
- Select the check boxes for 'Ansicht (View)' & 'Bearbeiten (Edit)' at Respective AOKs -> Click on 'Berechtigungen speichern (Save Grants)'.

Edit Goals Page
To edit goals pages follow given steps,
- Click on 'Inhalt(content)'.
- Choose the goals page to edit (check if Inhaltstype is 'Goals') -> Click on 'Bearbeiten(Edit)' button at right side respective at Titel column.
- Edit the page, after editing please make sure 'Vröffentlicht(published)' is chcked.
- Click on 'Speichern(Save)' button.
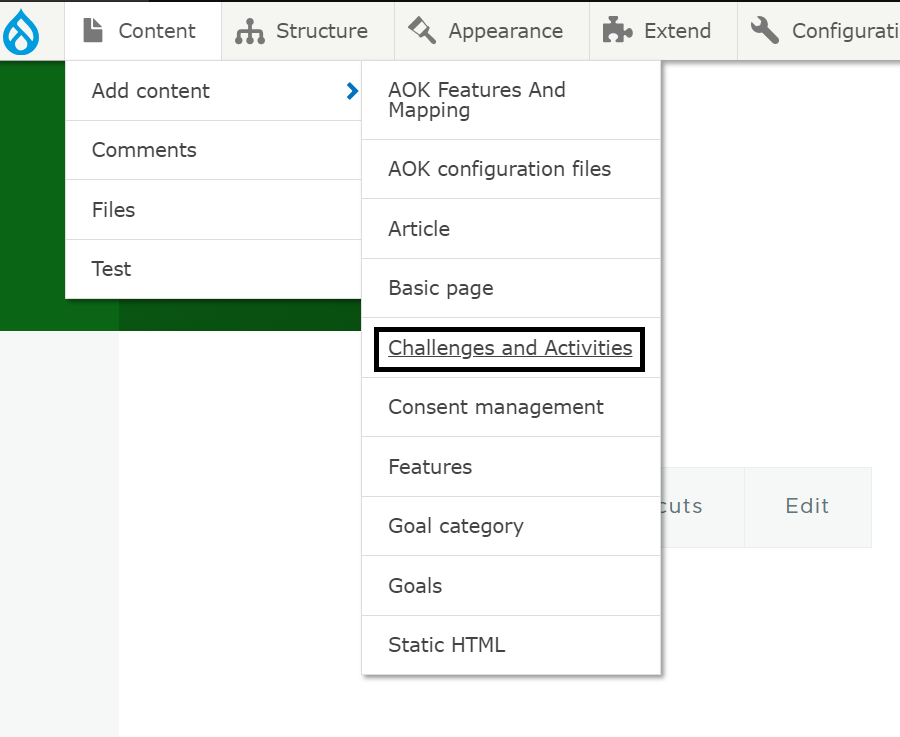
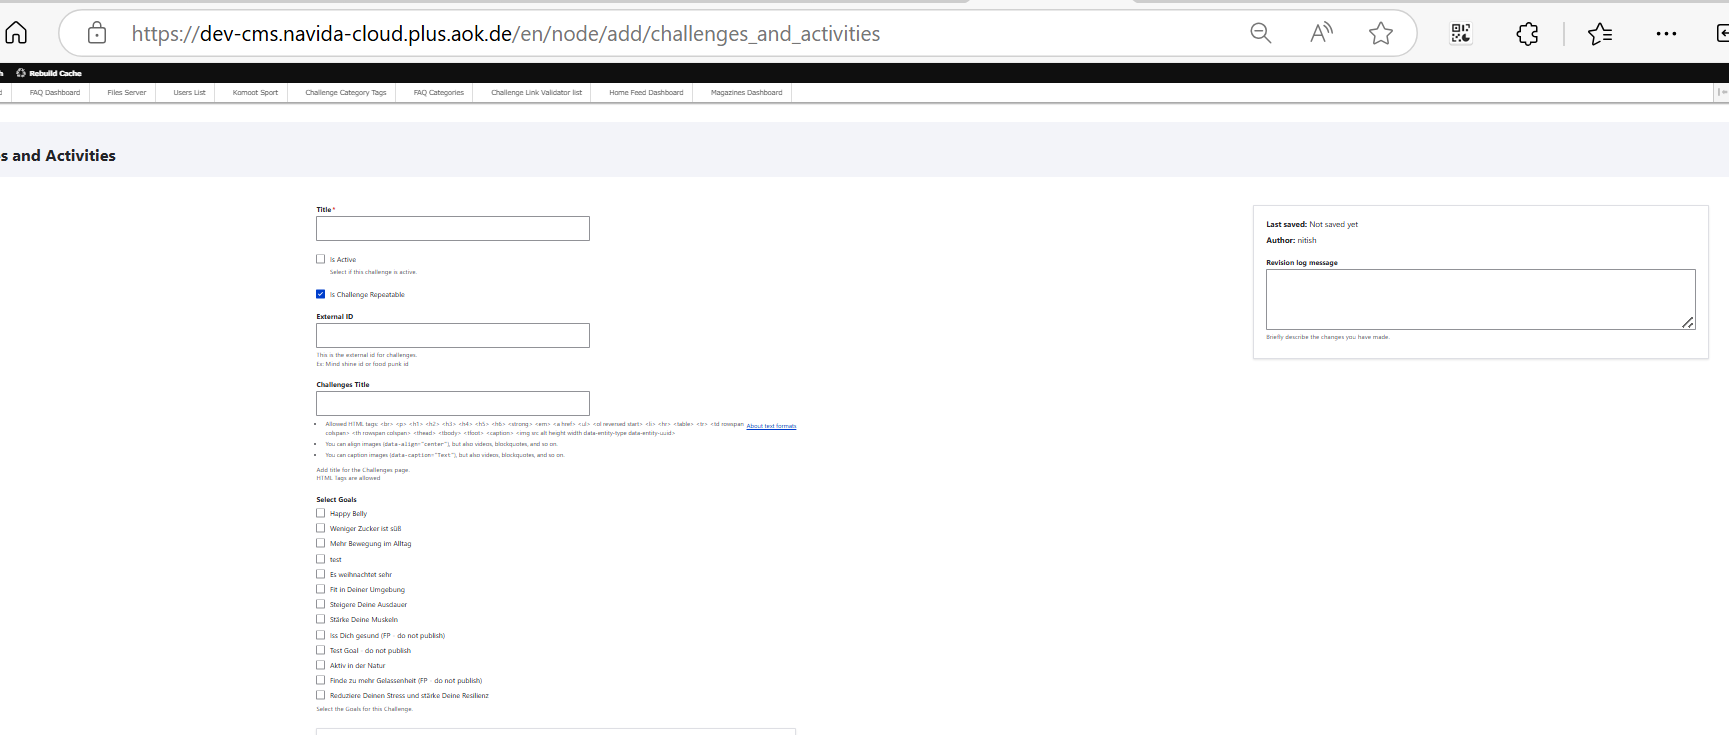
Create Challenges & Activities
- Select Inhalt (Content) -> Inhalt hinzufügen (Add Content) -> Challenges and Activities
- Enter 'Titel'
- Select 'Is Active' if the challenge is active.
- Uncheck 'Is Challenge Repeatable' checkbox if the challenge cannot be Repeatable.By default it is checked.
- Enter 'External ID' This is the external id for challenges.
- Enter 'Challenges Title' this field accept HTML tags.
- Select 'Select Goals' for this challenge.
- Add 'Challenge Icon' click on 'Dateibrowser öffnen (open file browser)' -> select image from the right section list of images -> click on 'Auswahlen (Select)' it will add image. (Please upload image in Files Server first and then select, do not upload image directly. Plese refer ImceFilesServer documentation for more information about how to upload images to CMS)
- Add 'Challenges Image' click on 'Dateibrowser öffnen (open file browser)' -> select image from the right section list of images -> click on 'Auswahlen (Select)' it will add image. (Please upload image in Files Server first and then select, do not upload image directly. Plese refer ImceFilesServer documentation for more information about how to upload images to CMS)
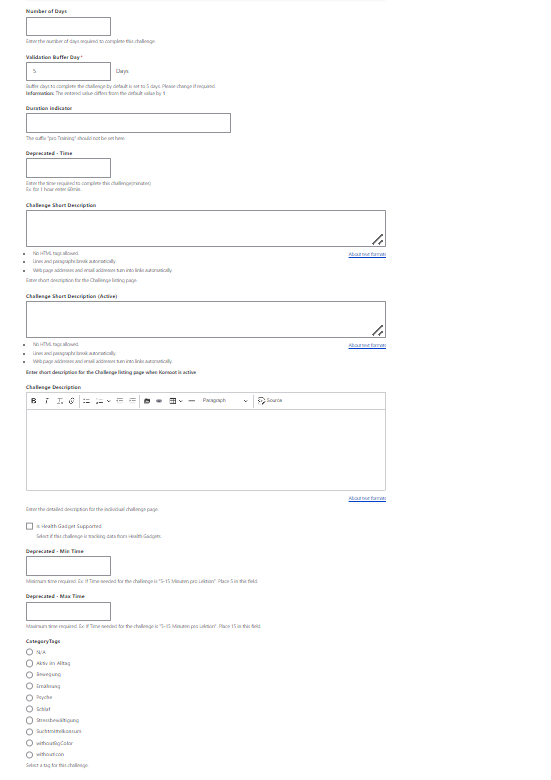
- Enter 'Number of Days' challenge completion days.
- Enter 'Validation Buffer Day' buffer days to complete a challenge . By default it is set to to 5 you can change if required.
- Enter 'Time' the time required to complete this challenge(minutes).
- Enter 'Challenge Short Description' description will be displayed in Challenges Listing page.
- Enter 'Challenge Description' formatted, it can accept HTML tags.
- Select 'Is Health Gadget Supported' if this challenge is tracking data from Health Gadgets.
- Enter 'Deprecated-Min & Deprecated-Max Time'
- Select 'CategoryTags' for this challenge.
- Enter 'Level' when you will type a word, if this Level text is already available in CMS it will give the suggetion. You can select/add levels using comma. Ex. High, Low
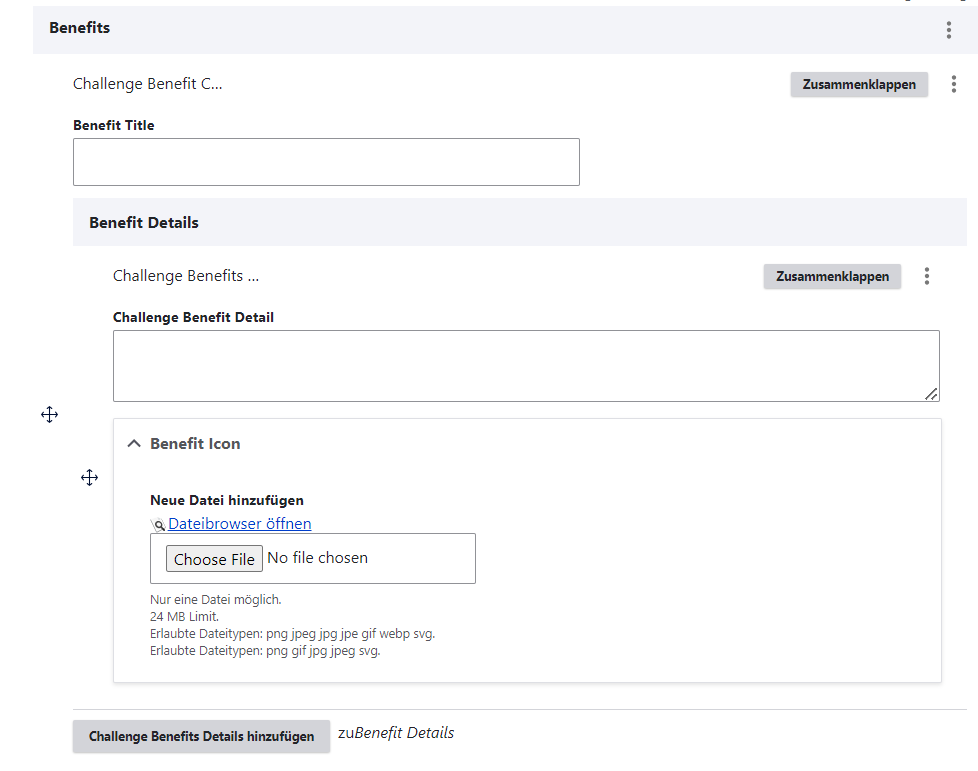
Add Challenge Benefits
- Enter 'Benefit Title'
- At Benefit Details it's a repetative field. Enter 'Challenge Benefit Detail'
- Add 'Benefit Icon' click on 'Dateibrowser öffnen (open file browser)' -> select image from the right section list of images -> click on 'Auswahlen (Select)' it will add image. (Please upload image in Files Server first and then select, do not upload image directly. Plese refer ImceFilesServer documentation for more information about how to upload images to CMS)
Add Challenge Precaution Card(In active Screen)
- Enter 'Challenge Precaution Title'
- Enter 'challenge Precaution Description' formatted, it can accept HTML tags.
- Add 'Precaution Image' click on 'Dateibrowser öffnen (open file browser)' -> select image from the right section list of images -> click on 'Auswahlen (Select)' it will add image. (Please upload image in Files Server first and then select, do not upload image directly. Plese refer ImceFilesServer documentation for more information about how to upload images to CMS)
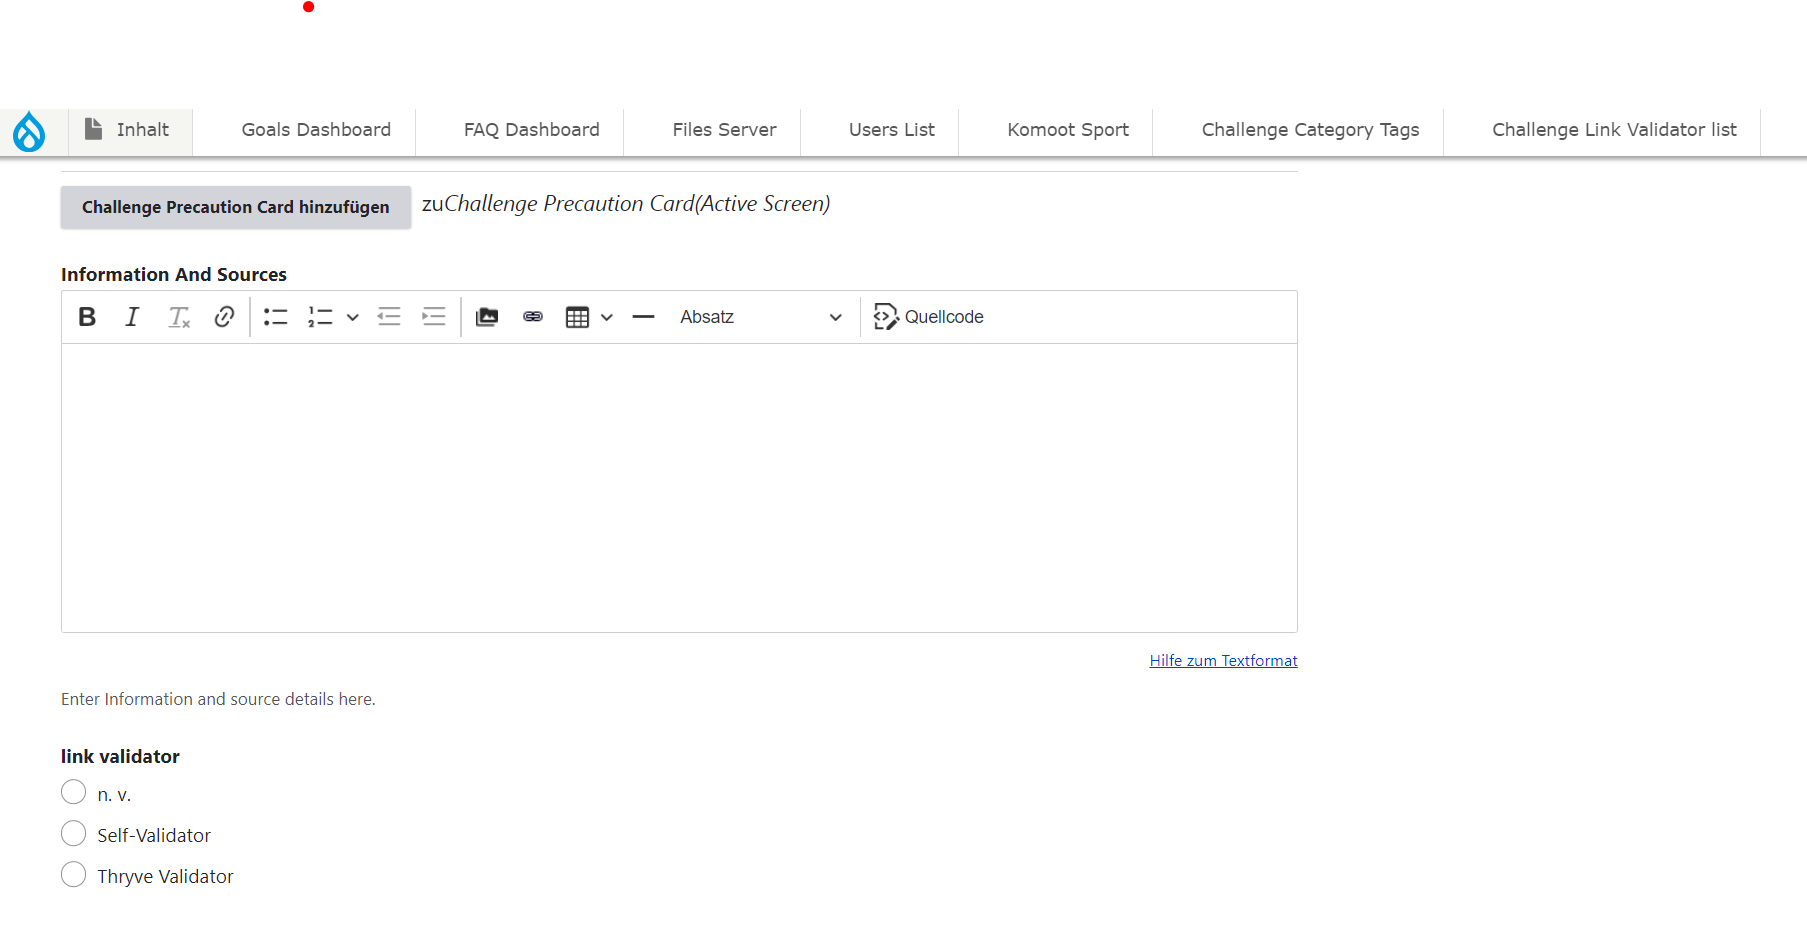
Add Challenge Precaution Card(Active Screen)
- Enter 'Challenge Precaution Title'
- Enter 'challenge Precaution Description' formatted, it can accept HTML tags.
- Add 'Precaution Image' click on 'Dateibrowser öffnen (open file browser)' -> select image from the right section list of images -> click on 'Auswahlen (Select)' it will add image. (Please upload image in Files Server first and then select, do not upload image directly. Plese refer ImceFilesServer documentation for more information about how to upload images to CMS)

- Enter 'Information And Sources' formatted, it can accept HTML tags.
- Select a Link validator from the list
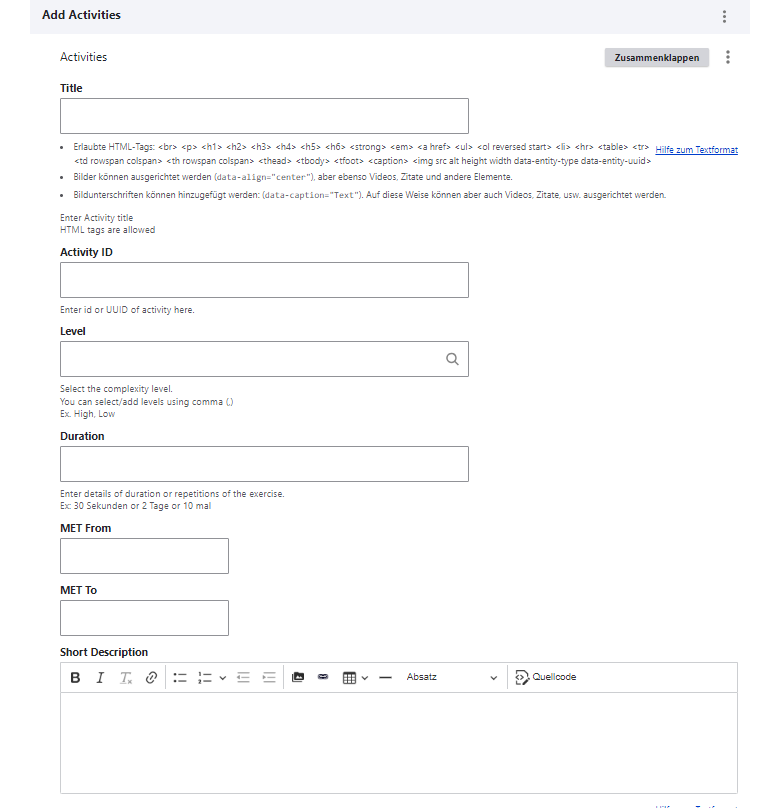
Add Activities
- Enter 'Title' for activities.
- Enter 'Activity ID'
- Enter 'Level' when you will type a word, if this Level text is already available in CMS it will give the suggetion. You can select/add levels using comma. Ex. High, Low
- Enter 'Duration' Enter details of duration or repetitions of the exercise.
- Enter 'MET From' & 'MET To' its Numer fields
- Enter the 'Image/Video URL' for the activity.
- Enter 'Short Description' of the activity, this is formatted field, accepts HTML tags.
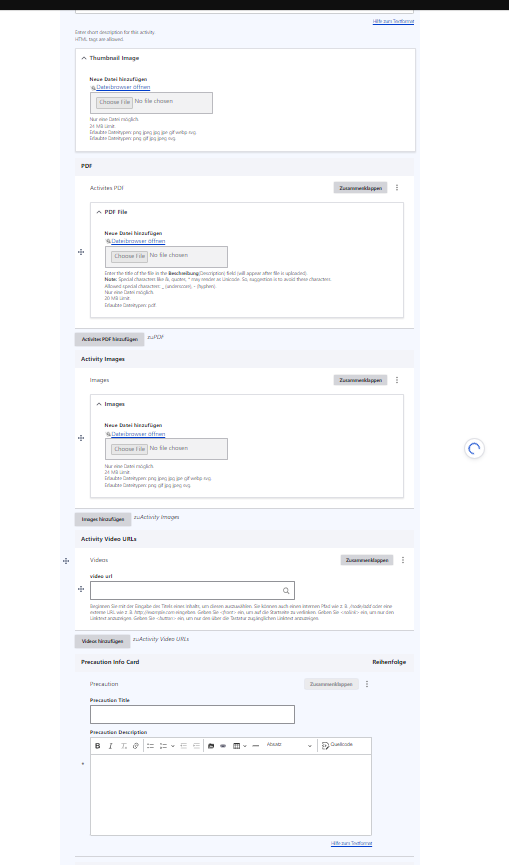
- Add 'Thumbnail Image' click on 'Dateibrowser öffnen (open file browser)' -> select image from the right section list of images -> click on 'Auswahlen (Select)' it will add image. (Please upload image in Files Server first and then select, do not upload image directly. Plese refer ImceFilesServer documentation for more information about how to upload images to CMS)
- Add 'Activites PDF' click on 'Dateibrowser öffnen (open file browser)' -> select pdf from the right section list of pdf -> click on 'Auswahlen (Select)' it will add pdf. (Please upload pdf in Files Server first and then select, do not upload pdf directly. Plese refer ImceFilesServer documentation for more information about how to upload pdf to CMS)
- Add 'Activity Images' click on 'Dateibrowser öffnen (open file browser)' -> select image from the right section list of images -> click on 'Auswahlen (Select)' it will add image. (Please upload image in Files Server first and then select, do not upload image directly. Plese refer ImceFilesServer documentation for more information about how to upload images to CMS)
- Add 'Activity Video URLs' at 'Video url' enter the url's of activity videos.
Add Precaution Info Card
- Enter 'Precaution Title'
- Enter 'Precaution Description' formatted, it can accept HTML tags.
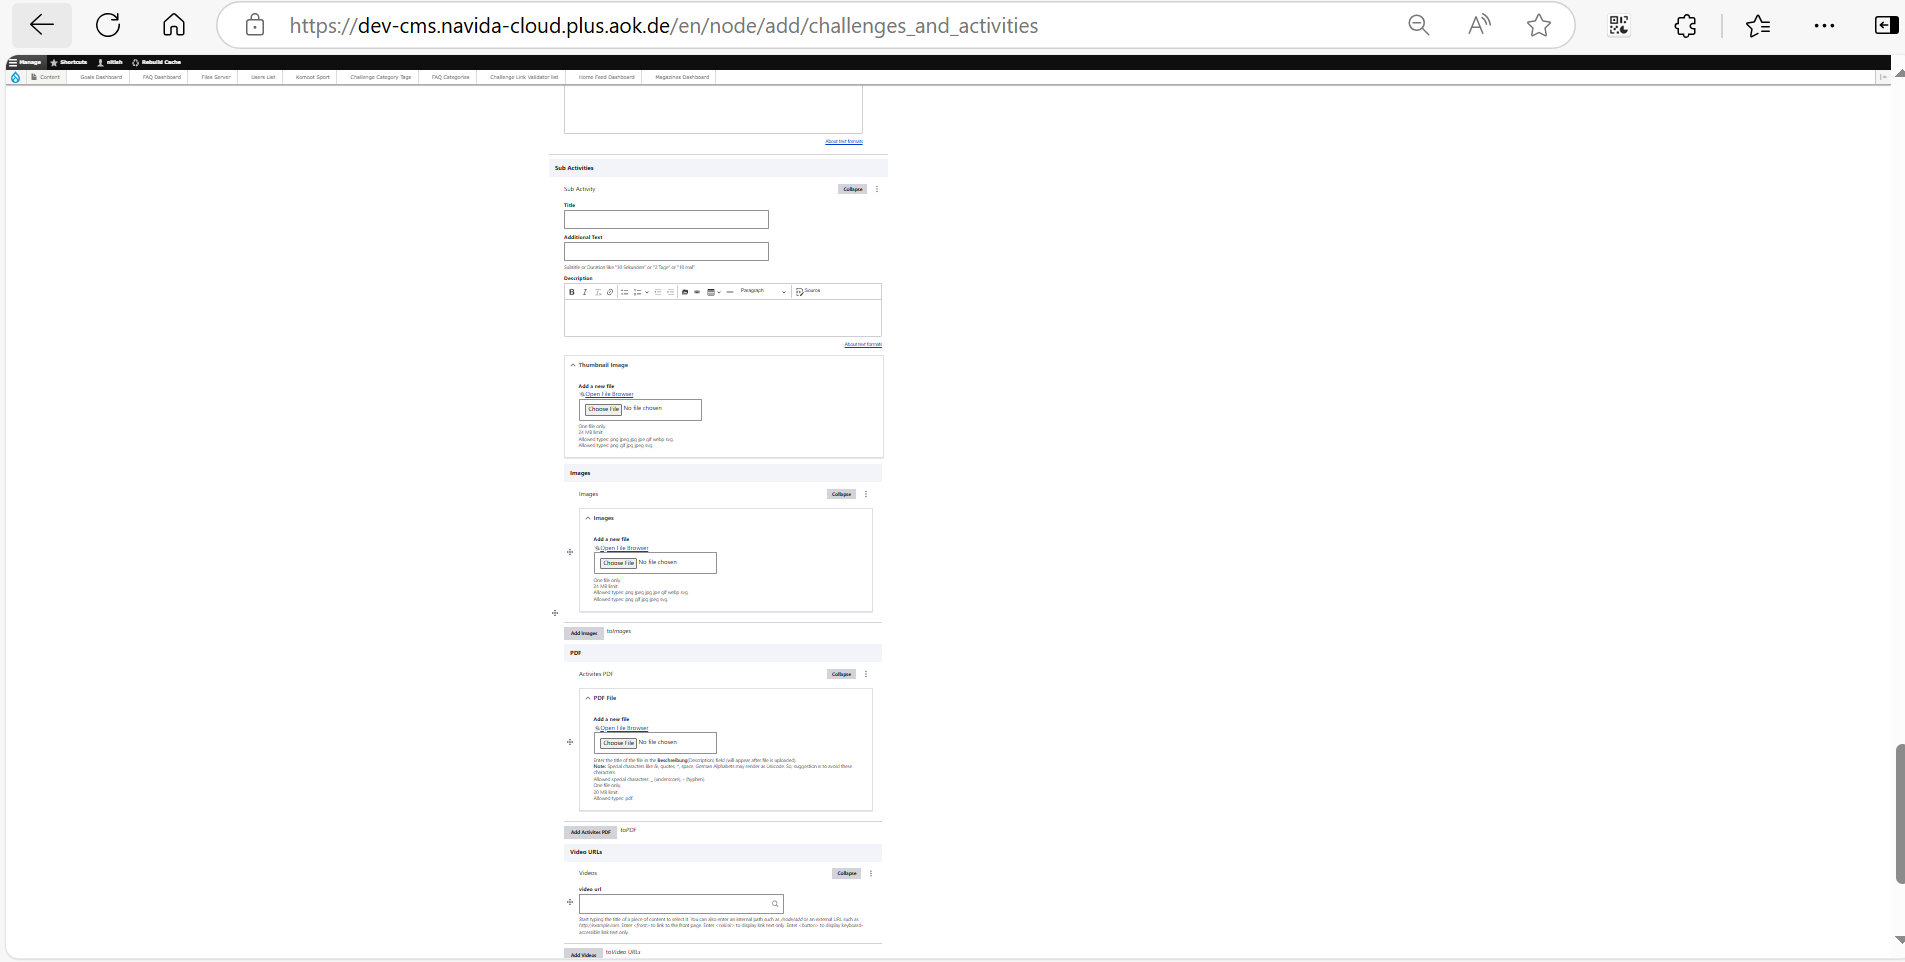
Add Sub Activities
- Enter 'Title'
- Enter 'Additional Text'
- Enter 'Description' formatted, it can accept HTML tags.
- Add 'Thumbnail Image' click on 'Dateibrowser öffnen (open file browser)' -> select image from the right section list of images -> click on 'Auswahlen (Select)' it will add image. (Please upload image in Files Server first and then select, do not upload image directly. Plese refer ImceFilesServer documentation for more information about how to upload images to CMS)
- Add 'Images' click on 'Dateibrowser öffnen (open file browser)' -> select image from the right section list of images -> click on 'Auswahlen (Select)' it will add image. (Please upload image in Files Server first and then select, do not upload image directly. Plese refer ImceFilesServer documentation for more information about how to upload images to CMS).
- Add 'Activites PDF' click on 'Dateibrowser öffnen (open file browser)' -> select pdf from the right section list of pdf -> click on 'Auswahlen (Select)' it will add pdf. (Please upload pdf in Files Server first and then select, do not upload pdf directly. Plese refer ImceFilesServer documentation for more information about how to upload pdf to CMS)
- Add 'Video URLs' at 'Video url' enter the url's of sub activity videos.
- Enter 'Sub Activity Precaution' formatted, it can accept HTML tags.
- Click on 'Activities Hizufugen (Add activities)' to add multiple activities.
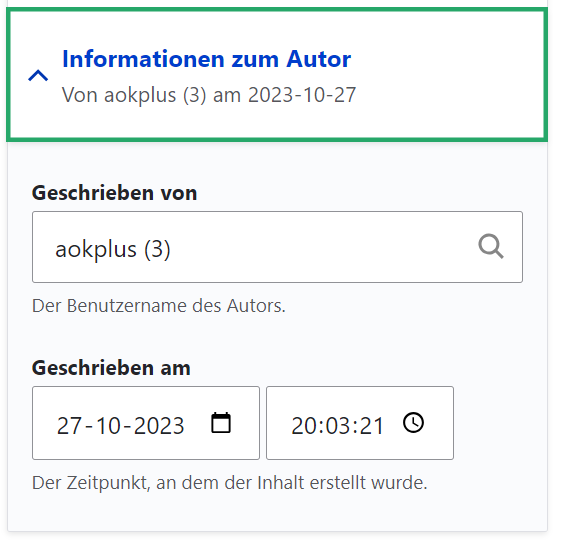
- After adding information we need to give access to AOK User, click at right side 'Informationen zum Autor (Authering Information)' section. Enter Username at 'Geschrieben von (Authored by)' field & select user.
- Click on 'Speichern (Save)' check if 'Veröffentlicht (Published)' checkbox is checked.
- After saving, we need to provide Grant for the AOK user we have added. Click on 'Grants' tab.
- Select the check boxes for 'Ansicht (View)' & 'Bearbeiten (Edit)' at Respective AOKs -> Click on 'Berechtigungen speichern (Save Grants)'.
Edit Challenges & Activities Page
To edit Challenges & Activities pages follow given steps,
- Click on 'Inhalt(content)'.
- Choose the Challenges & Activities page to edit (check if Inhaltstype is 'Challenges & Activities') -> Click on 'Bearbeiten(Edit)' button at right side respective at Titel column.
- Edit the page, after editing please make sure 'Vröffentlicht(published)' is chcked.
- Click on 'Speichern(Save)' button.
Important Notes
- Goal Category will be created & edited by Super User (Admin), If you want to edit or add new Goal Category contact CMS admin.
- After adding Goals & Challenges short description, detailed description. about Goals & Challenges must be added.
- Please refer ImceFilesServer documentation to know more about how to upload images into CMS.